
Getting a character to speak convincingly on screen has always been a delicate dance of performance, sound, and editing. For years, bad dubbing has been a running joke in cinema. Now, with AI, we face a new version of this challenge: the digital uncanny valley, where mouths move but the soul of the performance is missing. I’ve spent countless hours experimenting with different tools, feeding them images and audio, and frankly, most of the results are pretty rough. But every so often, a workflow emerges that just works. It’s less about finding one magic button and more about knowing which tool to pick for the specific job at hand. The team at Curious Refuge recently broke down a few solid methods, and it mirrors a lot of what I’ve found in my own process. Let’s walk through a few practical ways you can create realistic lip sync with AI without losing your mind.
The Text-to-Performance Method: Google VEO
Sometimes, all you have is an idea—a character’s face and a line of dialogue. For moments like these, where speed is more important than granular control, the text-to-video approach is incredibly effective. This method involves taking a static image, feeding it a line of text, and letting the AI generate the entire performance, including the voice and facial animation. It’s the most direct path from concept to a moving, talking character, and it’s perfect for pre-visualization, storyboarding, or creating content quickly.
My current tool of choice for this is Google VEO, particularly when used within their “Flow” interface. The process is straightforward: you start with a character image, maybe one you’ve crafted with a tool like Midjourney. You upload it, type the dialogue you want the character to say, and let VEO generate a few different takes. This ability to get multiple options is crucial, as AI performance can be unpredictable; having four variations allows you to choose the one with the most believable emotion and timing. This workflow is a testament to how far we’ve come; generating a talking character is now as simple as writing a prompt. If you’re looking to get started with crafting compelling AI characters, my 10 Powerful Midjourney Prompts for Character Design can give you a solid foundation.
However, there’s a critical final step. Most of these quick-generation tools output video at a lower resolution, like 720p. For any serious film project, this needs to be upscaled. I consistently use Topaz Video AI for this, as it does a remarkable job of enhancing detail without creating that weird, overly smooth “AI look.” By running the 720p clip through Topaz and upscaling it to 4K using their Proteus model, you can transform a rough-and-ready animation into a clean, cinematic shot that integrates seamlessly into a high-resolution timeline. This final touch makes all the difference between a cool experiment and a usable piece of footage.
The Audio-Driven Workflow: HeyGen & 11 Labs
For projects that demand more emotional depth and vocal nuance, separating the audio performance from the visual generation is essential. This workflow gives you the freedom to direct a voice actor, record your own performance, or use a sophisticated text-to-speech engine to get the exact tone, pacing, and inflection you need. Once you have that perfect audio file, you can then sync it to your character’s image. This method is all about control and is my preferred way to create realistic lip sync with AI for character-driven scenes.
The combination of 11 Labs for audio and HeyGen for animation has produced some of the most impressive results I’ve seen. With 11 Labs, you can generate incredibly lifelike voice performances, tweaking stability and clarity to get a wide emotional range. After you have your audio file, you bring it into HeyGen. Their “Photo Avatar” feature is surprisingly powerful, especially because it allows for a text prompt to guide the physical performance. You can tell it “an angry coach yells at his players,” and the AI will add subtle movements and expressions that match the intensity of the audio. This is a huge step up from static, robotic mouth movements. For a deeper dive into how these new models are changing the game, check out my thoughts on Veo & Flow for Cinematic Realism.
Just like with the VEO workflow, there’s a post-production step that elevates the final output. HeyGen’s videos can sometimes have a slightly unnatural, jittery frame rate. The solution, once again, is Topaz Video AI, but this time using its Frame Interpolation feature. By enabling this with the Kronos model, the software intelligently smooths out the motion and converts it to a standard 24 or 25 fps. This process eliminates that subtle, high-shutter-speed look and replaces it with a smooth, cinematic motion that feels much more organic and professional. It’s a small step that makes a massive impact on the final quality.

The Performance Capture Approach: Runway Gen-2
When you need the highest level of detail and authenticity, you need to capture a real human performance. This is the closest AI filmmaking gets to traditional motion capture or digital puppetry. The idea is to record a “driving video”—often just a simple recording of yourself or an actor performing the lines to a webcam—and then transfer that entire performance onto your target character. This method captures all the subtle nuances: the head tilts, the eye shifts, the precise timing of the mouth movements. It’s the most complex workflow, but it also yields the most controllable and often most believable results.
Runway’s Gen-2 has a feature that handles this process remarkably well. You provide it with two inputs: the driving video with the actor’s performance and the target video or image of the character you want to animate. Runway then analyzes the facial movements in the driving video and maps them directly onto the character. This is incredibly powerful for syncing dialogue to a character that already exists in a shot, allowing you to essentially “re-animate” their face with a new performance. This technique is a core part of many modern Filmmaking AI Workflows and bridges the gap between generation and directable performance.
The key to success with this method is understanding its limitations. Performance capture tools like Runway’s are sensitive and require a clear, unobstructed view of the actor’s face in both the driving video and the target shot. If a character covers their mouth with their hand or turns too far away from the camera, the AI can fail to detect the face and the process will error out. This means you have to be deliberate in your shot selection. Choose target clips where the character is relatively front-facing and their face is clear. It’s a technical constraint, but working within it allows you to create realistic lip sync with AI that feels truly directed.
Building the Scene: From Clips to Conversation
Generating a single, well-synced clip is a technical achievement, but filmmaking is about storytelling, and that means creating scenes. The true test of these AI tools is whether the generated shots can be edited together into a cohesive and emotionally resonant conversation. This is where the craft of filmmaking reasserts itself. The pacing of a shot/reverse-shot sequence, the use of reaction shots, and the underlying sound design are what ultimately sell the reality of the scene.
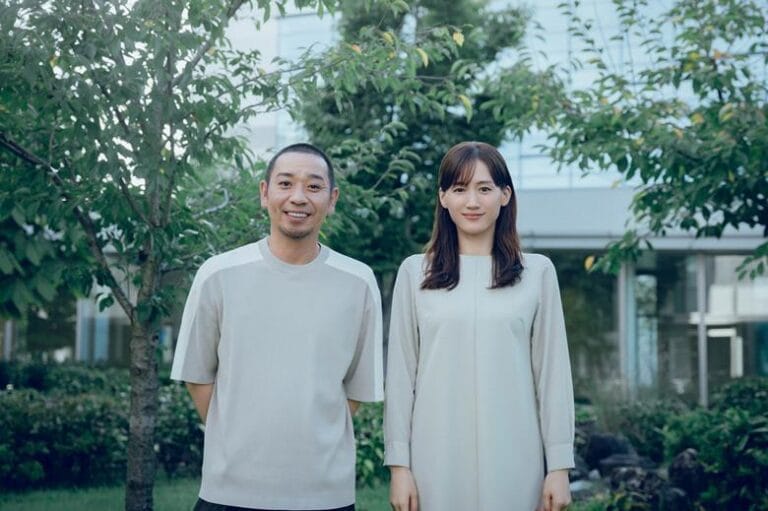
The coffee shop conversation shown in the Curious Refuge video is a perfect example. On their own, the clips of the man and woman are just isolated talking heads. But when cut together, they form a narrative. The timing of their lines, the pauses in between, and the shared audio environment make us believe they are in the same room, having a real conversation. This is a crucial reminder that AI is a tool for creating assets, not a replacement for the editor’s intuition. The art is in the assembly, in knowing when to hold on a character’s expression and when to cut away to hide a minor imperfection in the lip sync.
My practical tip here is to lean heavily on sound design to stitch your AI-generated shots together. A consistent room tone or ambient soundscape is the glue that will bind your scene. Add subtle foley, like the clink of a coffee cup or the rustle of clothing, to ground the characters in a physical space. If you have a moment where the lip sync isn’t quite perfect, don’t be afraid to use a classic editing trick: cut to a shot of the other character listening. This not only hides the flaw but also enhances the emotional dynamic of the scene. Ultimately, your job as a filmmaker is to use every tool at your disposal—AI included—to make the audience feel something.

Conclusion
There is no single “best” tool to create realistic lip sync with AI. The reality of the craft right now is about building a toolbox of different workflows. For a quick animated social post, the text-to-video speed of Google VEO is perfect. For a character moment that depends on a specific vocal performance, the HeyGen and 11 Labs combo offers incredible control. And for scenes demanding the most nuanced, human performance, Runway’s video-to-video capture is the way to go. Each has its place, its strengths, and its quirks.
Our role as creatives is to understand these methods and choose the right one for the story we’re trying to tell. The technology is a collaborator, not a magic wand. It still requires our eye, our taste, and our storytelling instincts to bring it all together. If you’re looking to streamline your creative process even further, my prompt guide, AI Render Pro, can help you generate the stunning visuals that these performances will inhabit.
What kinds of characters or stories are you hoping to bring to life with these tools?

FAQ
What is the best free AI lip sync tool?
While many professional tools like HeyGen and Runway have paid tiers, some platforms offer limited free trials that are great for experimenting. However, for consistent, high-quality results without watermarks, investing in a paid plan for one of the tools mentioned in this guide is usually necessary to achieve a professional standard.
Can I use my own voice for AI lip sync?
Absolutely. The audio-driven workflow (using HeyGen) is perfect for this. You can simply record your voice performance as an MP3 or WAV file and upload it. Similarly, the performance capture workflow (using Runway) uses a video of you speaking to drive the animation, so your own vocal performance is integral to the process.
How do I avoid the “uncanny valley” with AI lip sync?
Avoiding the uncanny valley is about more than just accurate mouth shapes. It’s about ensuring the entire facial performance—eyes, brows, head movements—feels natural. Using tools that allow for performance capture (Runway) or motion prompting (HeyGen) helps significantly. Additionally, high-quality audio, good sound design, and clever editing to cut away during awkward moments are key to making a performance feel believable.
Discover more from Olivier Hero Dressen Blog: Filmmaking & Creative Tech
Subscribe to get the latest posts sent to your email.